

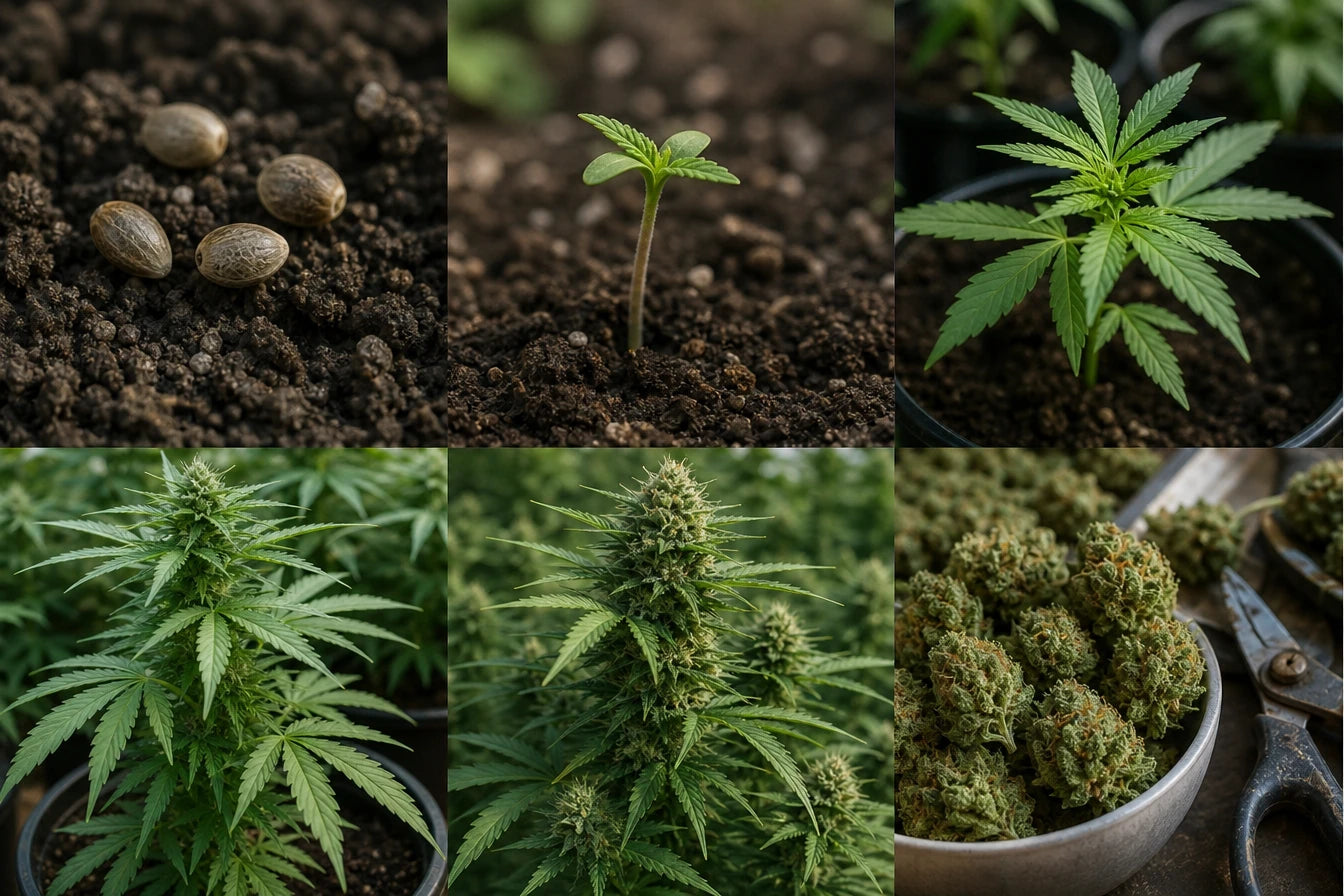
Exploring the world of CBD-rich cannabis cultivation offers both rewarding and insightful experiences. Gaining a clear understanding of each phase, from seed to harvest, is essential for raising healthy plants rich in beneficial cannabinoids. This guide explains the core cannabis cultivation steps, offering practical insights into what unfolds during every stage and highlighting key actions that lead to successful crops.
The start of the journey: germination and soaking seeds
Every thriving CBD plant begins with a single seed. While the process may appear straightforward, careful attention at this initial point forms the basis for future robust growth. Germination marks the official starting line in the cannabis life cycle, transforming a dormant seed into a living organism eager to develop.
Before introducing seeds to any growing medium, experienced cultivators often recommend soaking seeds in water for about 24 hours. This simple step hydrates and softens the seed shell, greatly improving the odds of successful sprouting. Once soaked, placing seeds between damp paper towels creates an ideal setting for seeds to break open and begin their journey toward becoming seedlings.
Sprouting seeds and initiating root development
With the right combination of moisture, warmth, and darkness, seeds typically sprout within several days. The emergence of a small taproot signals the shift from dormancy to active growth. Planting these newly sprouted seeds about half an inch deep in loose soil or another suitable substrate allows roots to anchor securely while seeking out nutrients and moisture.
As soon as sprouts push through the surface, gentle handling is crucial. Roots are fragile, so using tweezers or gloved hands helps minimize disturbance and supports steady progress during this delicate stretch of the growth stages.
Common mistakes at germination time
Cannabis seeds thrive in moderate humidity and temperatures between 20–25°C. Exposing them to dryness, excessive heat, or damaging emerging roots can disrupt germination. Consistent monitoring keeps new growers on track and gives every seedling the best shot at survival.
Experimenting with methods—such as direct seeding versus using germination plugs—helps discover what suits specific environments or preferences. Regardless of chosen strategy, patience is critical. Rushing the germination stage often results in fewer viable seedlings moving forward in the seed to harvest process.
Nurturing young plants: the seedling stage explained
Once the first set of leaves appears, the seedling stage officially commences. At this moment, plants focus intensively on building strong root systems and developing their earliest true leaves. For those interested in exploring CBD wellness further, you can discover a range of premium CBD products that reflect the benefits of careful cultivation. These distinctive leaf sets provide the vital energy needed for ongoing development.
Seedlings need steady yet gentle light sources, such as fluorescent tubes or low-intensity LEDs. Placing lights too close risks scorching tender foliage, while inadequate lighting leads to weak, stretched stems. If you are considering alternative consumption methods, CBD vape products offer a discreet and efficient way to enjoy cannabidiol. Avoiding overwatering is equally important, since excess moisture can trigger root diseases during this vulnerable phase.
Managing nutrition and watering during the seedling stage
Early on, cannabis plants do not demand heavy feeding. Nutrient-rich organic soil generally supplies everything needed for the initial growth stages. If an inert substrate is used, a lightly diluted nutrient solution formulated for seedlings ensures smooth progress without risk of burn or toxicity.
After two or three sets of leaves have formed, roots strengthen and watering routines become easier to manage. Stable humidity near 60–70% and gentle air circulation help deter disease and reinforce stems in preparation for the upcoming vegetative growth phase.
Spotting common seedling issues
Yellowing leaves, stunted growth, or wilting points to problems like improper lighting, incorrect watering, or temperature stress. Rapidly addressing these challenges enables seedlings to recover without lasting harm. Daily monitoring and minor adjustments along the way often prevent larger setbacks as plants advance through the life cycle.
Stabilizing environmental conditions and responding promptly to visible symptoms usually distinguish vigorous seedlings from those struggling to progress further.
From tiny shoots to bushy plants: vegetative growth phases
The vegetative growth phase transforms delicate seedlings into robust, leafy plants. As roots establish themselves, shoots expand quickly both upward and outward. During this vital period, plants absorb nutrients, increase photosynthesis, and build sturdy stems capable of supporting future flower production.
This stage’s duration depends on both strain genetics and grower goals. Some home gardeners transition quickly to flowering, while others extend the vegetative phase to achieve bigger yields. Keeping good records throughout this period assists in evaluating which timelines fit different varieties or setups.
Optimizing light and nutrient schedules for rapid growth
During vegetative growth, plants require intense lighting and regular feeding. Many indoor cultivators use an 18-hours-on, 6-hours-off light regimen to promote continuous leaf development. Balanced nutrients high in nitrogen foster lush foliage and encourage overall vigorous growth.
Topping or training techniques—like bending, pruning, or Scrogging—may be introduced now to control height and enhance yield potential later. Well-managed plants produce more branches and bud sites, maximizing flower formation in the upcoming flowering stage of the seed to harvest process.
Deficiency risks and pest prevention during vegetative growth
Rapid growth can sometimes cause deficiencies if nutrients are unbalanced. Leaf curling or discoloration often signals missing minerals, so timely intervention is important. Testing water pH and adjusting feed formulas resolve most issues before they escalate.
Regular inspections beneath leaves and along stems help detect pests early. Applying organic sprays or releasing beneficial insects prevents infestations and promotes long-term plant health across all growth stages.
The dramatic flower transformation: all about the flowering stage
The flowering stage is perhaps the most eagerly awaited milestone for every CBD grower. This is when buds develop and valuable cannabinoids like cannabidiol are produced. Indoors, flowering is typically triggered by shifting the light schedule to 12 hours on and 12 hours off, imitating autumnal sunlight patterns.
Plant metabolism changes significantly, prioritizing reproductive tasks over further vegetative growth. Buds swell, pistils appear, and resin glands multiply steadily as harvest time nears. The speed of maturity depends on genetics, but most strains reach peak readiness after 8–10 weeks of flowering.
Caring for CBD plants during flowering
Nutritional needs change compared to previous stages. While some nitrogen remains helpful, increased levels of phosphorus and potassium are crucial for blooming, enhancing both flower size and cannabinoid content. Using bloom-stage fertilizers supports optimal outcomes during this essential segment of the life cycle.
Keeping humidity in check reduces mold risk among dense buds. Improving airflow and spacing protects flowers from rot and fungal threats. Inspecting trichomes—the tiny crystals covering buds—reveals clues about ripeness; clear trichomes show immaturity, while cloudy ones indicate peak potency.
Key signs of maturity and timing the harvest
Recognizing the perfect harvest window maximizes both yield and CBD concentration. As flowering advances, many growers look for browning pistils and milky or amber-hued trichomes. These indicators suggest cannabinoid production has peaked, ensuring flavorful and powerful results after harvest.
Harvesting even slightly too early or late affects both taste and effects. Careful observation, note-taking, and magnification tools help growers refine their technique season by season, tailoring results to personal preferences and final uses.
Final steps: harvesting and post-harvest care
The culmination of dedicated cannabis cultivation steps arrives once flowers meet maturity criteria. With sharp shears, growers remove branches carefully, working methodically to protect bud structure and avoid bruising. Harvested branches then undergo trimming, removing fan leaves and refining the appearance of each flower cluster.
Proper drying preserves cannabinoids and terpenes, reducing harshness when consumed. Flowers should hang upside down in a cool, dark room with controlled humidity (ideally 55–65%). Gradual drying maintains aroma and effectiveness, while rushing this stage can diminish quality.
- Trim excess leaves for improved airflow and efficient drying.
- Monitor temperature and humidity closely to prevent mold.
- Handle buds gently to preserve sticky resin glands.
Curing: unlocking the full potential of harvested CBD buds
Even after drying, the process continues. Placing trimmed buds in airtight glass jars initiates curing, a gradual maturation where chlorophyll breaks down and flavors deepen. Opening jars daily (“burping”) for the first couple of weeks lets moisture escape, encouraging even drying and preventing spoilage.
Depending on preference, many enthusiasts cure their CBD harvest for four to eight weeks before consumption. Properly cured flowers deliver smoother effects, enhanced potency, and longer shelf life compared to samples taken straight from the dryer.
Storing and enjoying the fruits of labor
Following curing, storage conditions make a significant impact on product quality. Keeping buds in sealed containers, stored in cool, dark locations, preserves fresh aromas and strength for months. Regular checks ensure no moisture returns, protecting against accidental spoilage.
Many individuals transform part of their crop into tinctures, teas, or topicals, expanding possibilities beyond traditional smoking or vaporization. Thanks to attentive care throughout the seed to harvest process, every use reflects the unique skill and dedication invested in the grow.


